
Create an Invoicing system: Formidable Forms
In this guide you’ll learn how to use Formidable Forms Pro to create an invoicing system that allows you to create itemised invoices, assign them to your clients and keep track of payments made.
NB. This tutorial assumes you have a website built using WordPress.
Here’s what you’ll need:
- Formidable Forms Pro (some pro fields & views are required)
Optional Extras:
- Print-O-Matic or DK PDF Plugin – Allows your customers to print / download the invoices.
- A client management plugin – We use WP-Client which offers us additional options (but this isn’t required).
- Formidable Payment Add-on – All of our customers pay via bank transfer or cheque but you could easily use payment add-ons like PayPal to collect payments online.
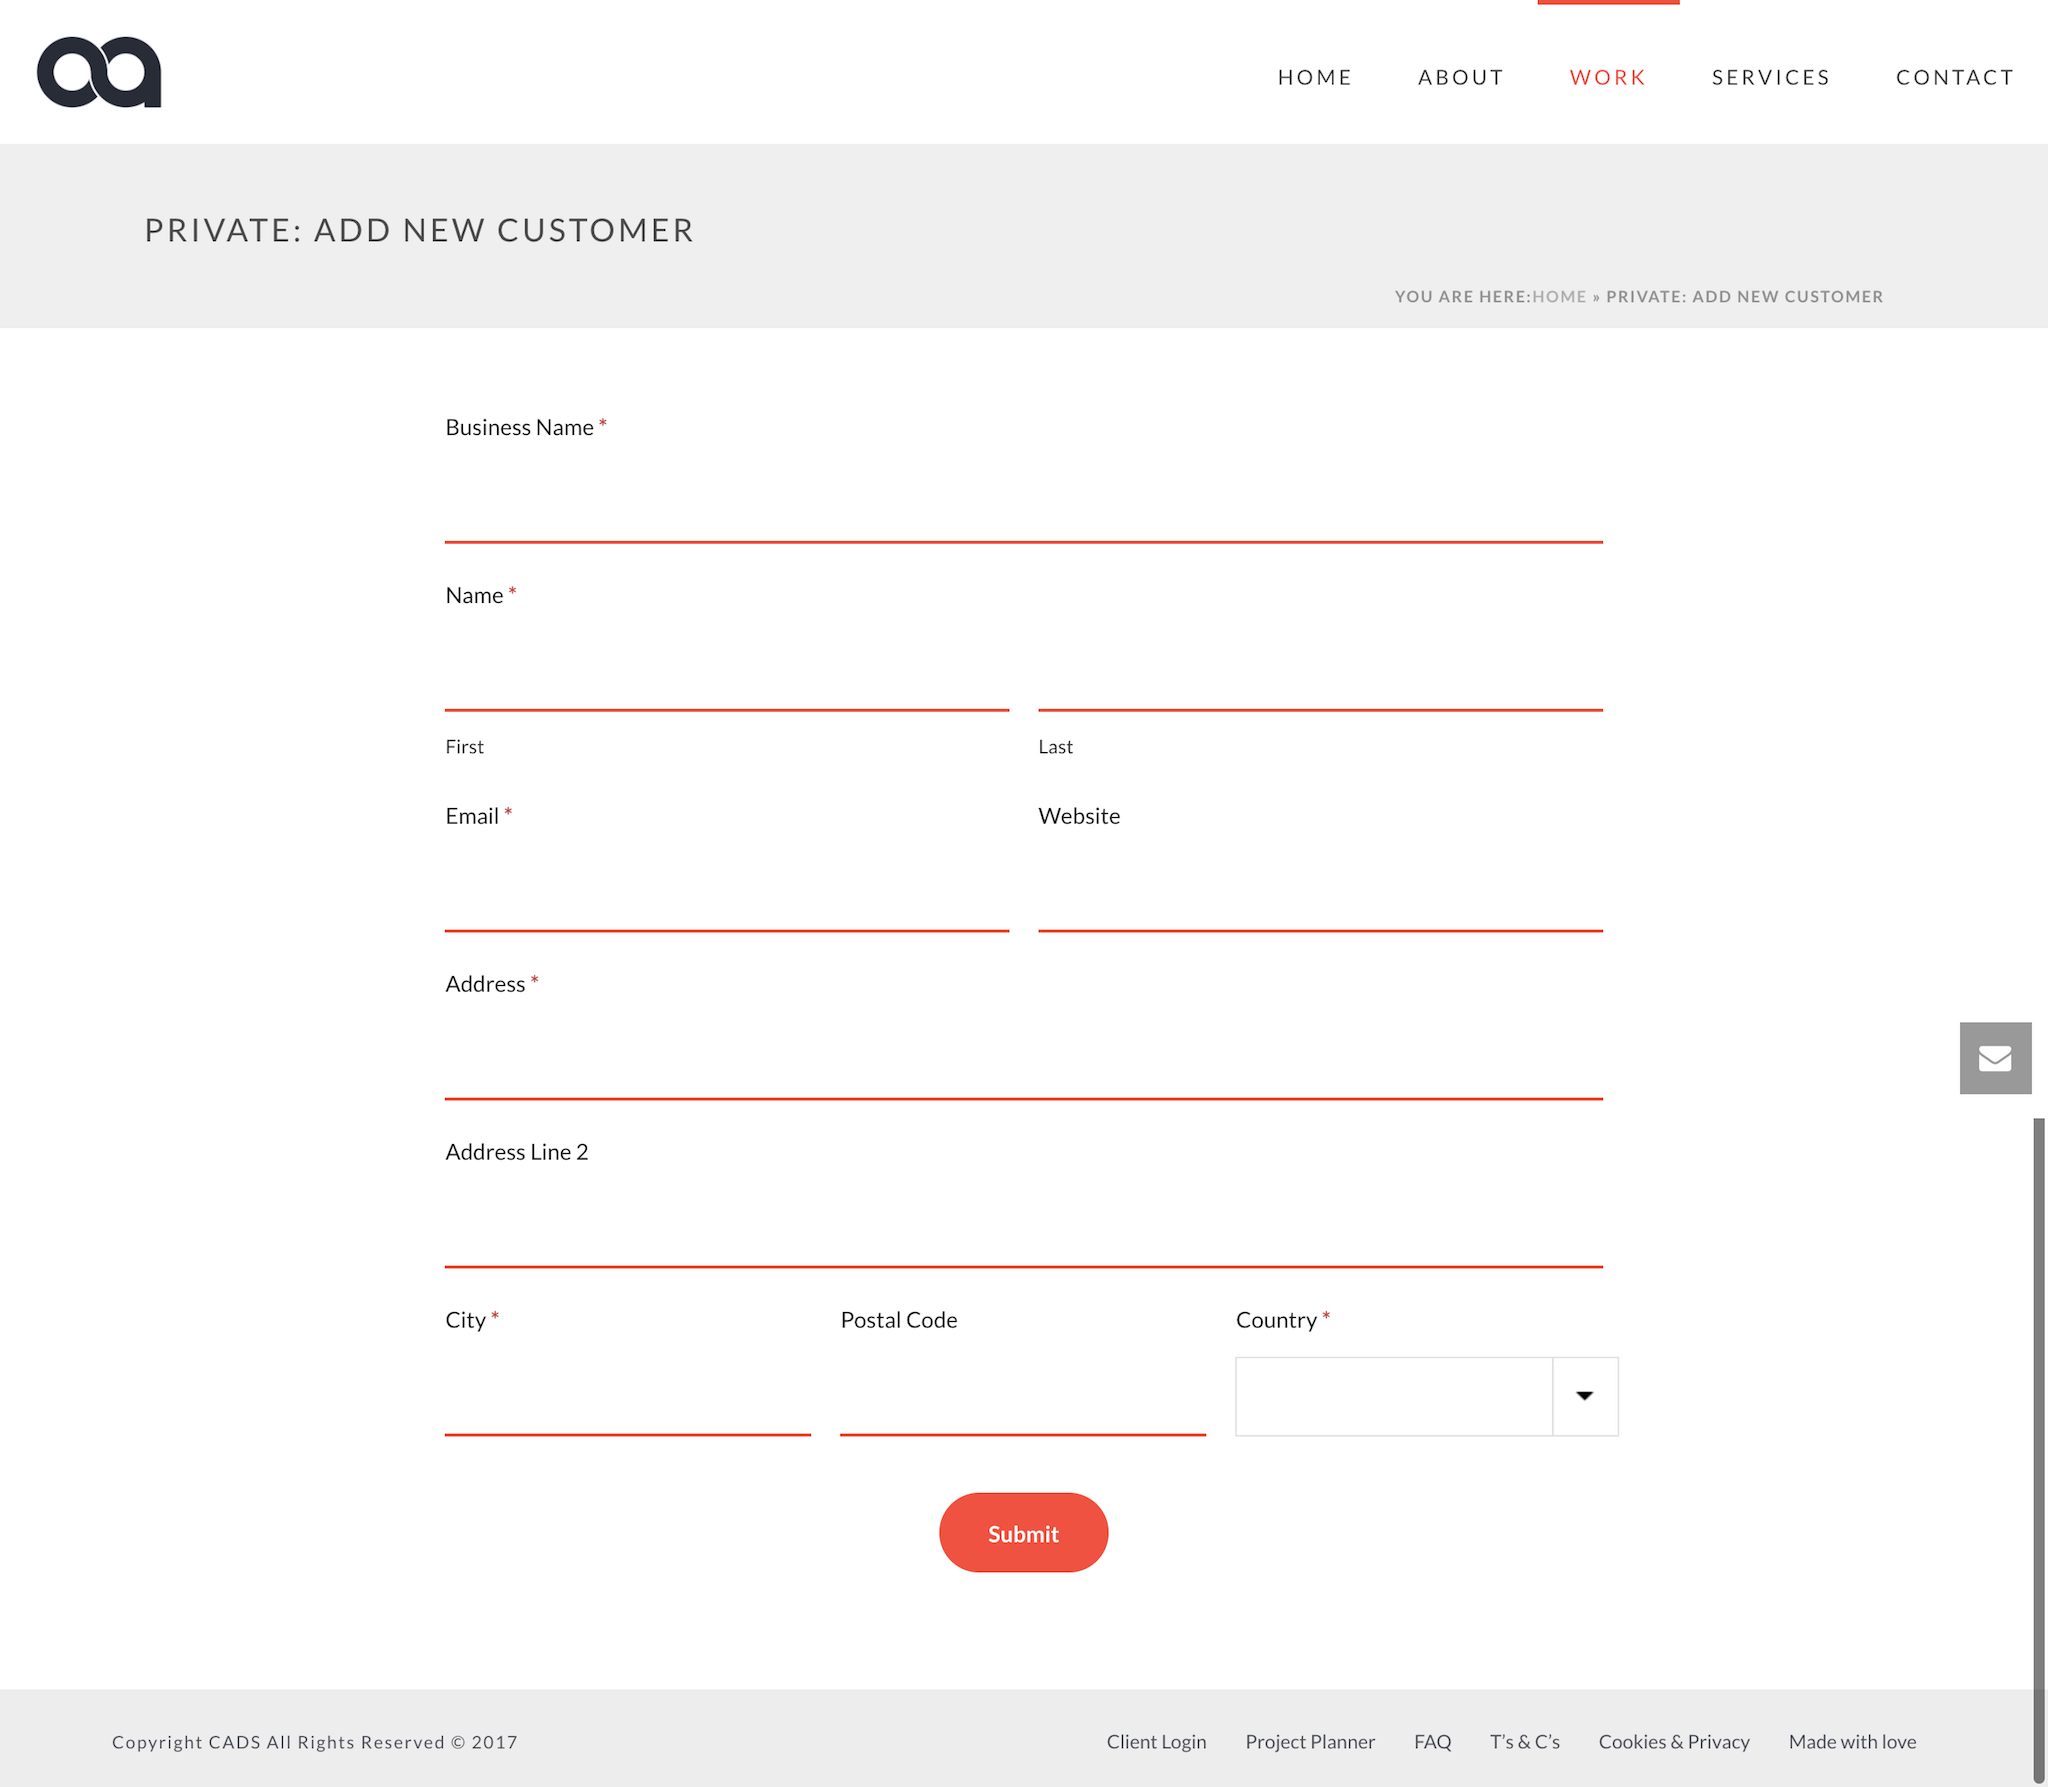
Invoicing system: Adding A New Customer Form
Before you begin, a little set up is required for our invoicing system. This includes creating a couple of forms for Admin use only. One of these include:
Add a new customer form – This form is created for collecting your customers name & address information. For the purposes of this tutorial, you can use the standard ‘User Information’ form template that comes with FP. We just added a ‘Business Name’ field to it.
NOTE: You will need to have a field in your form that you can use to assign your invoices to a customer. We have a field in the user’s profile called ‘Client Business Name’ so we can make sure that the ‘Business name’ field in the ‘Add a new customer’ form matches this entry exactly. You could use a standard field like ‘display name’ or ‘nickname’ to the same effect.
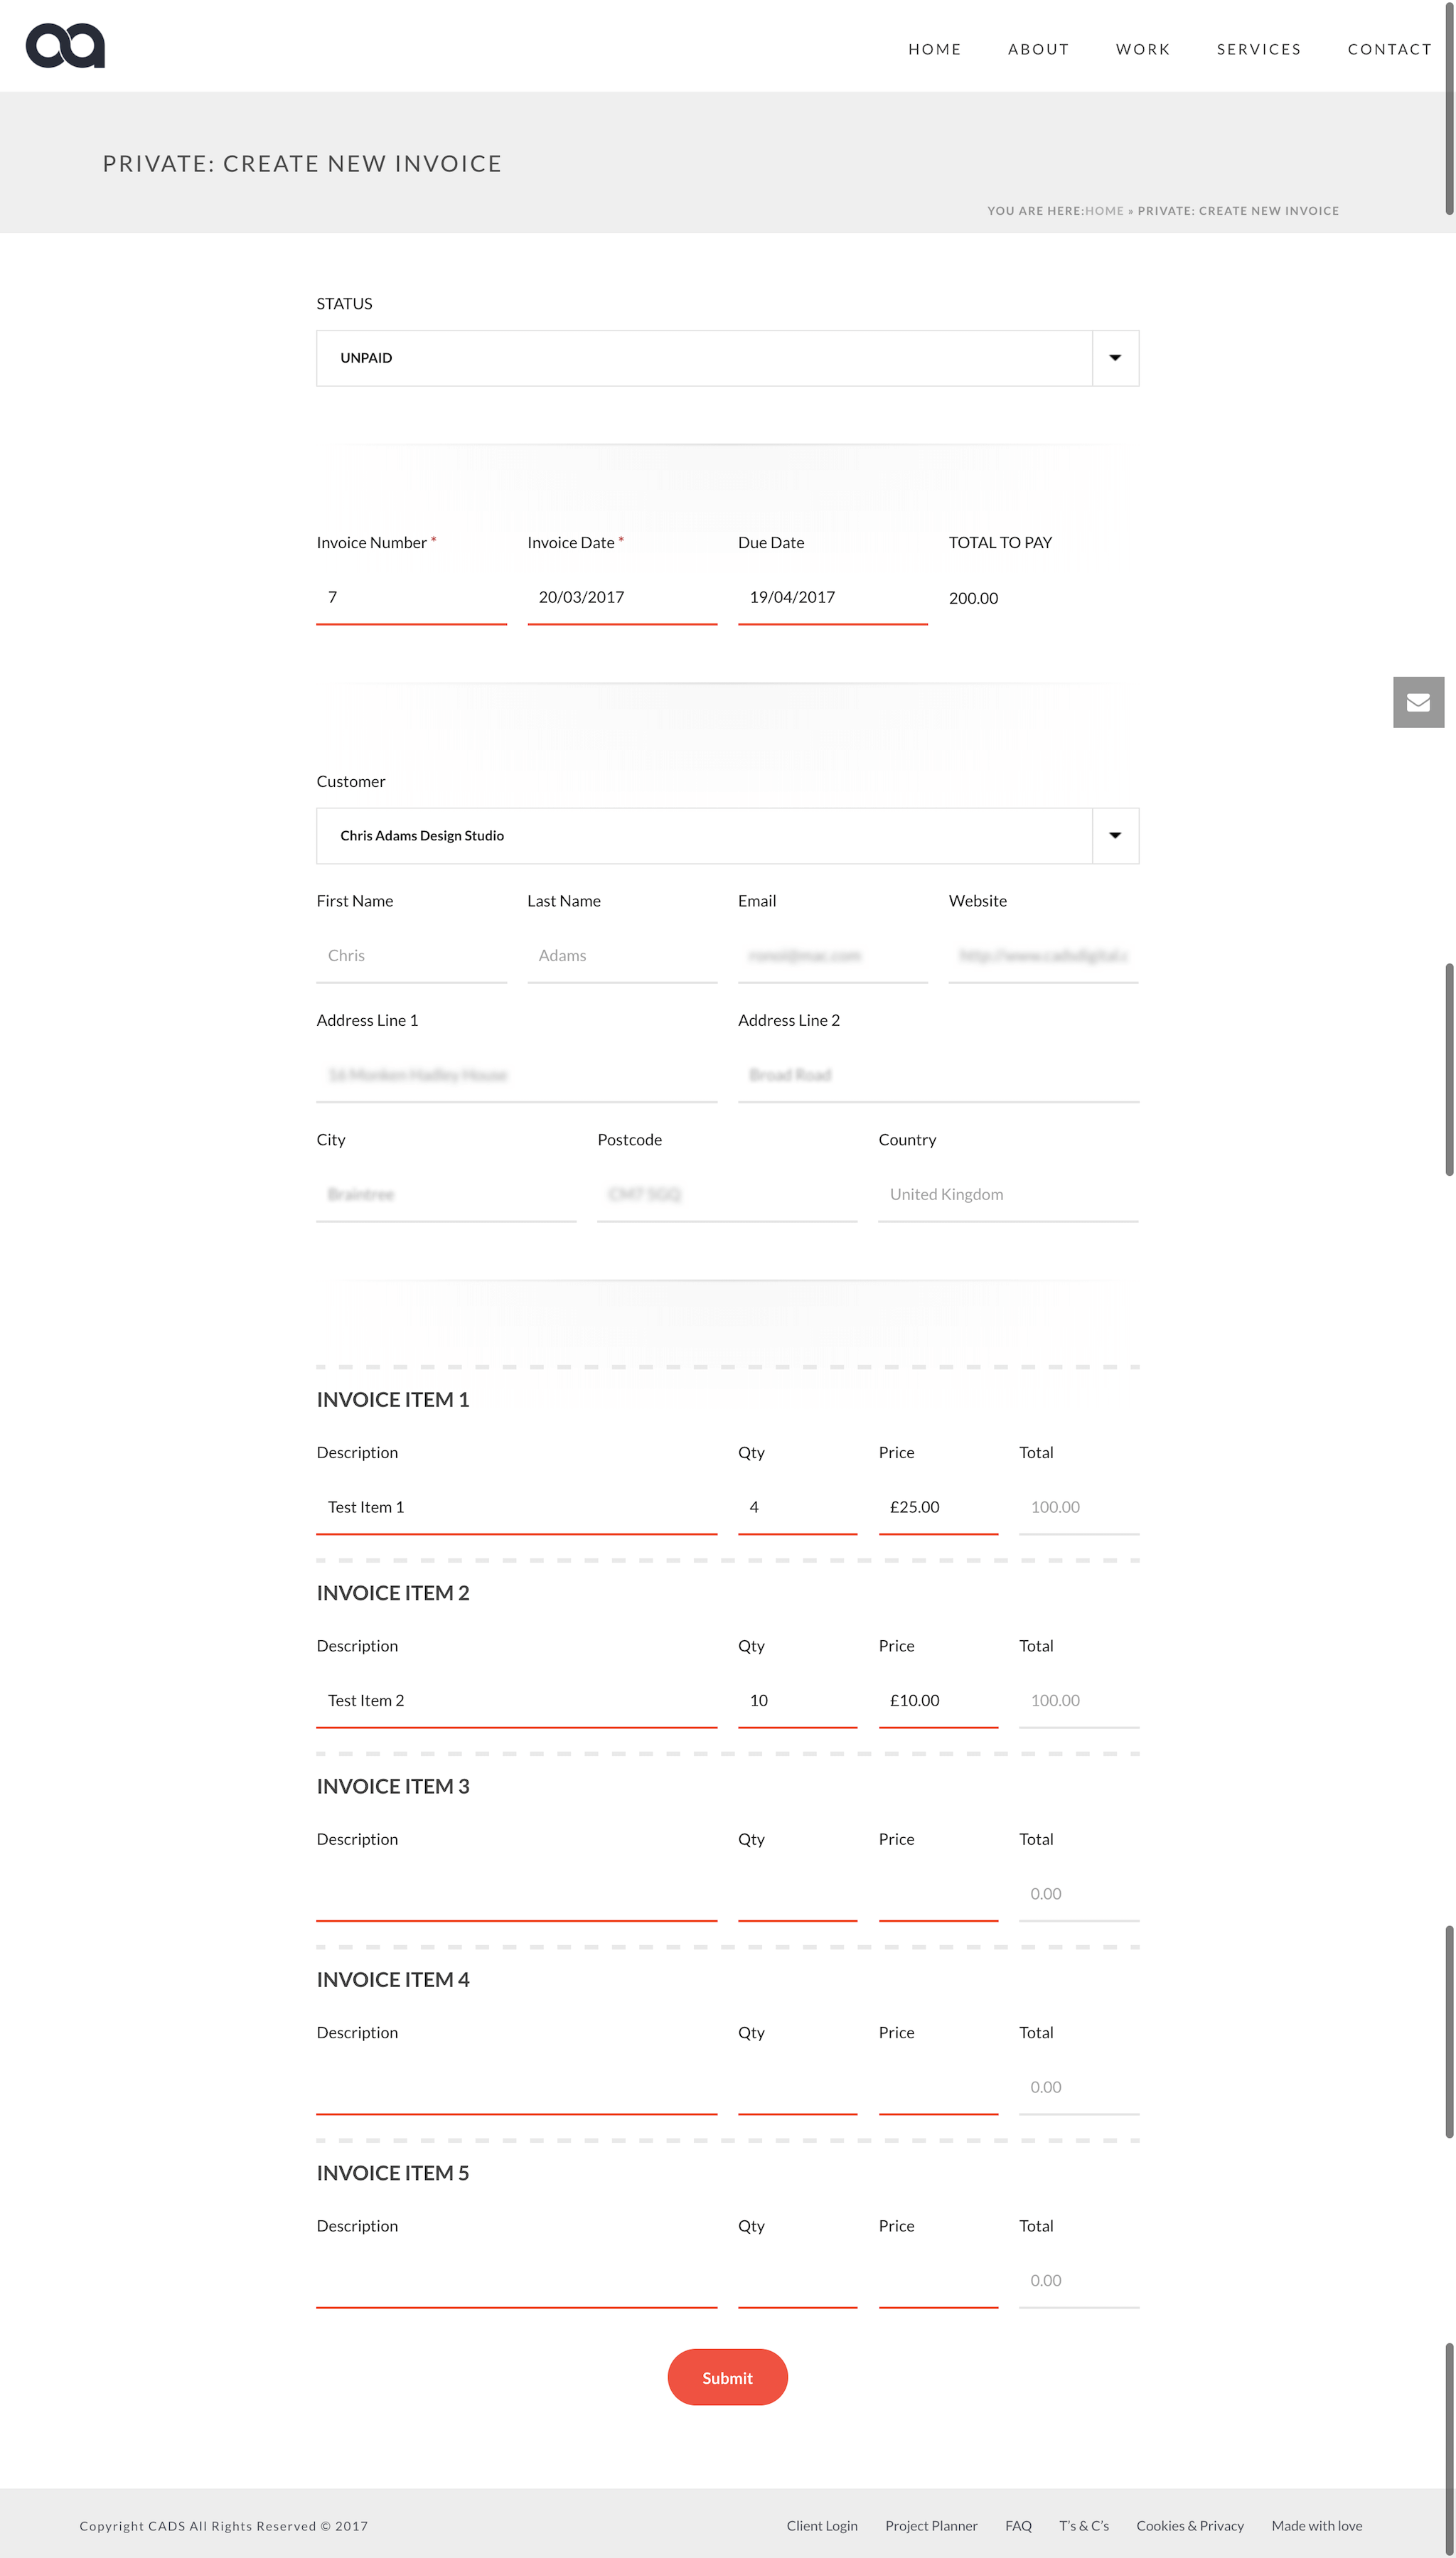
Invoicing system: Adding A New Invoice Form
Once you’ve added the new customer form, we’ll need to add another four the invoicing system to work.
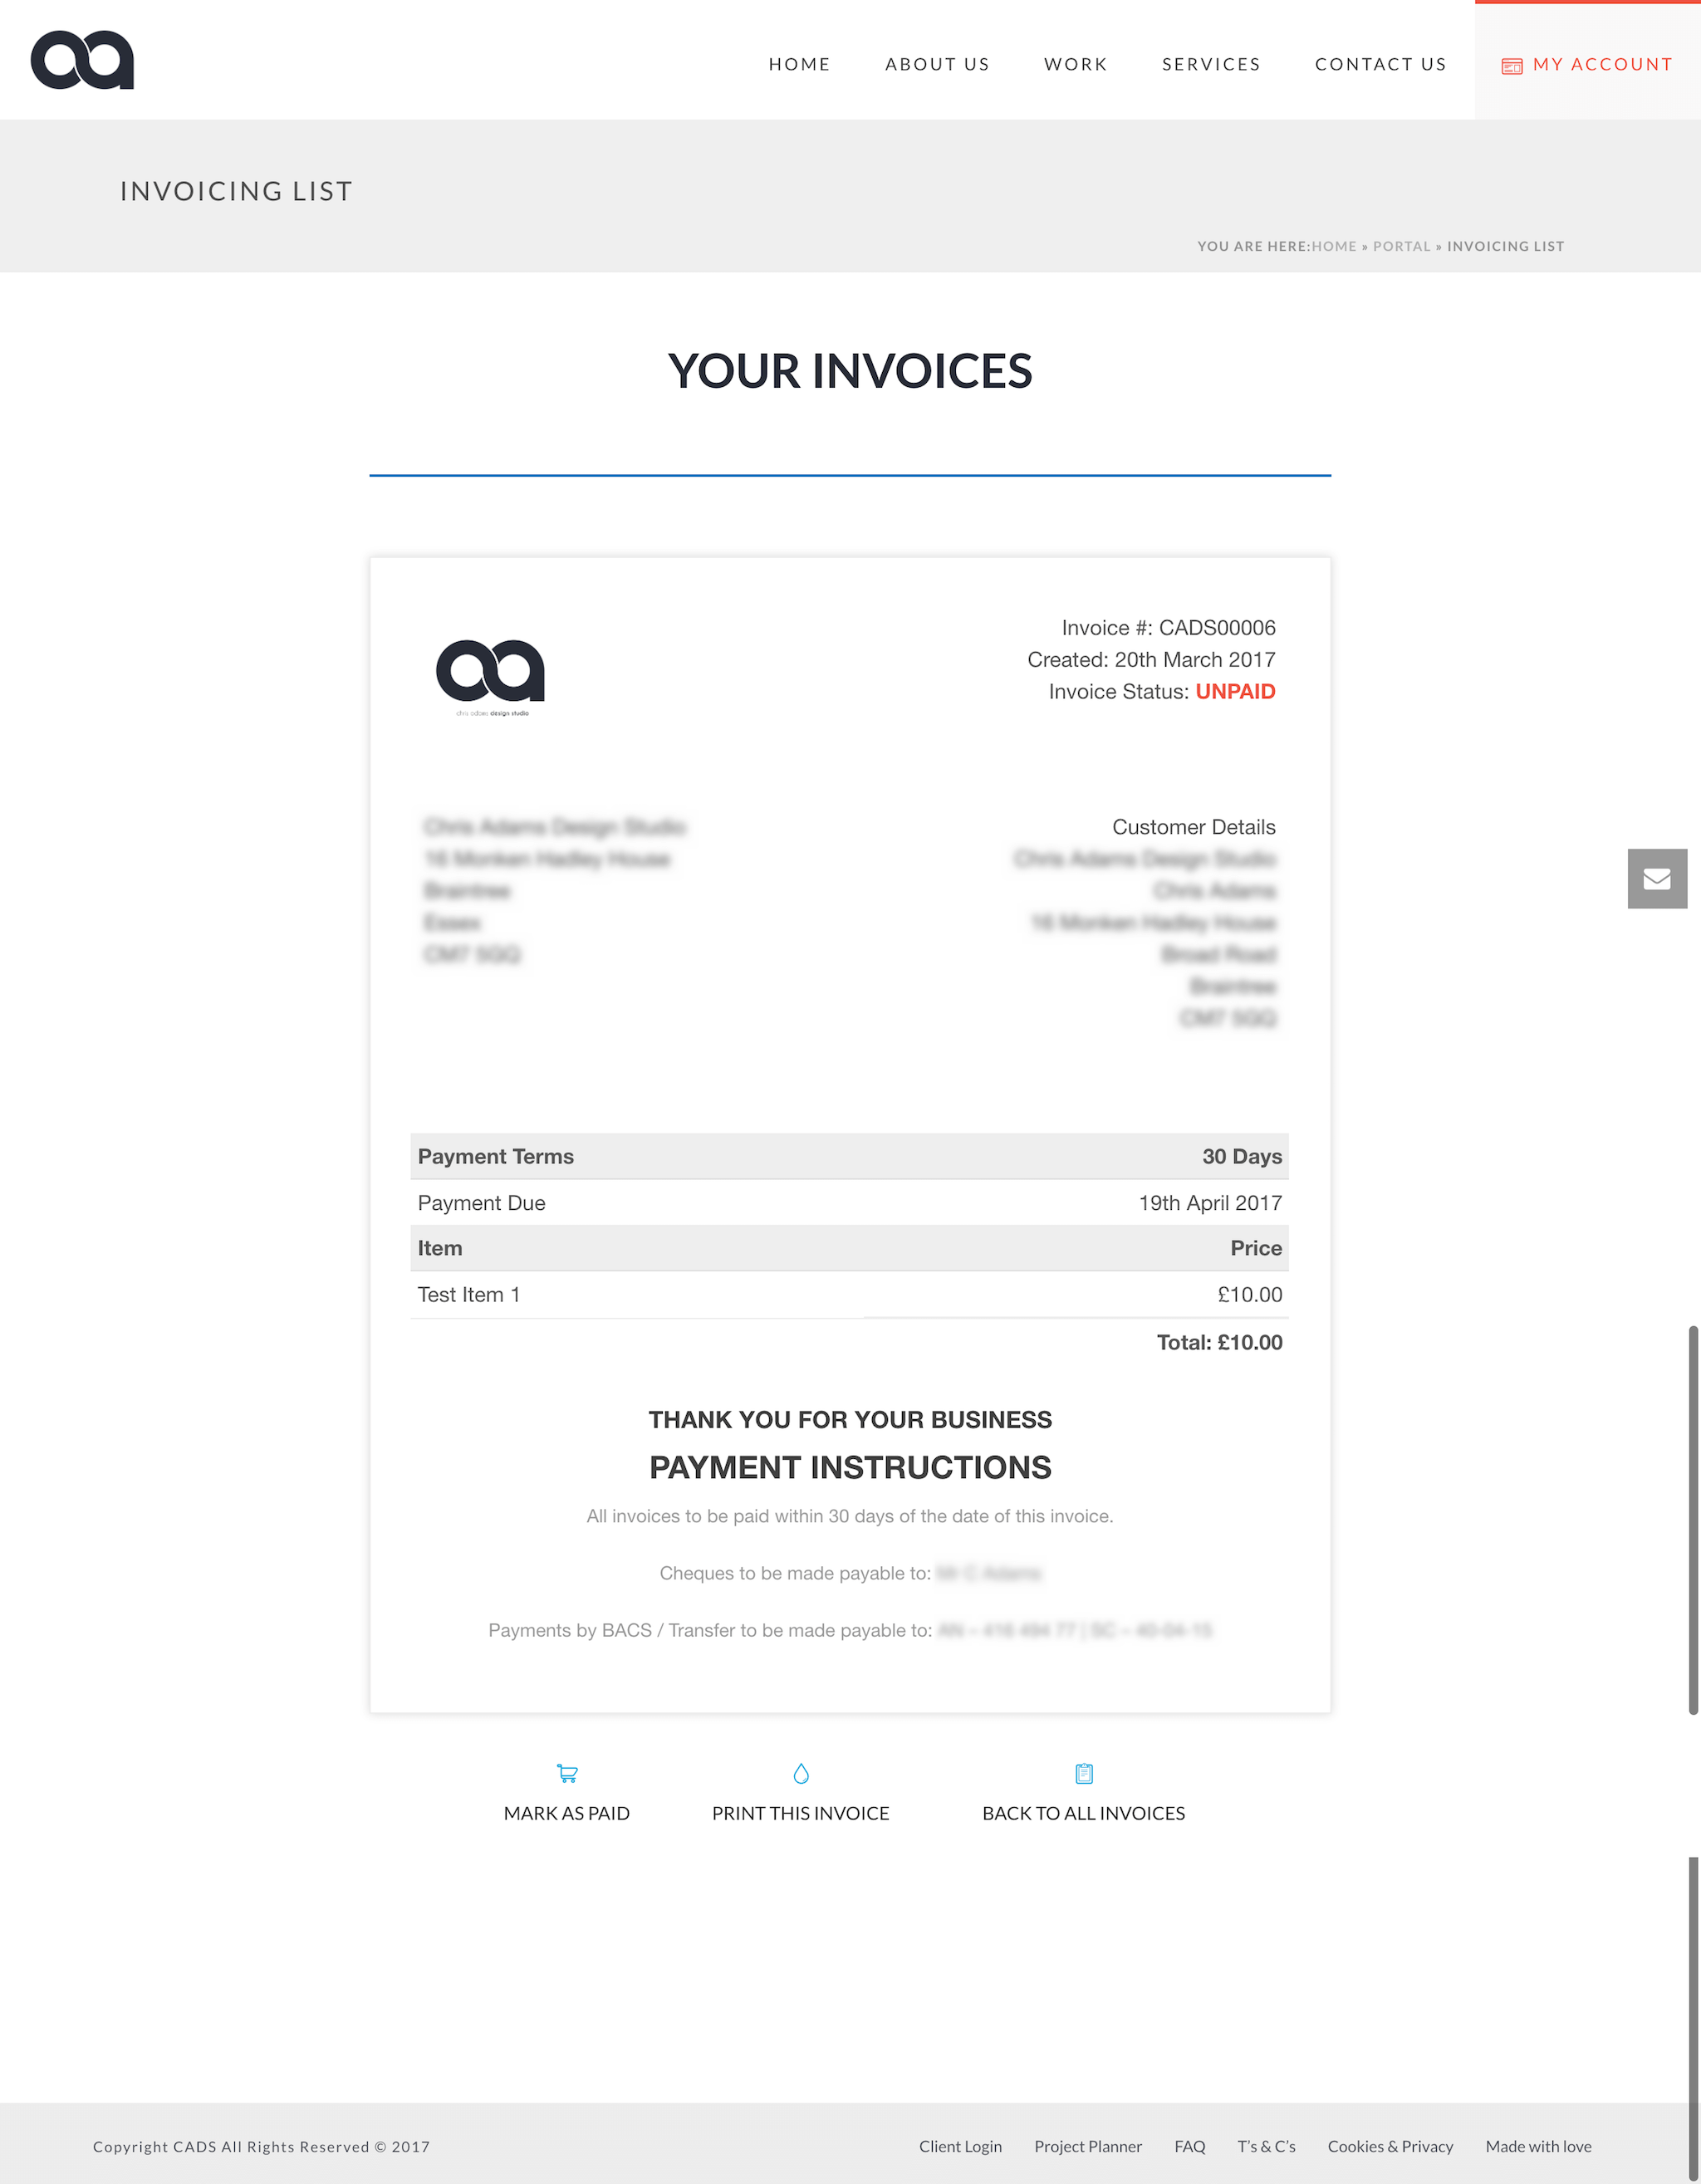
Add a new invoice form – This form will be used to create your invoices. It will need to contain everything you want to show up on your invoice that’s customer specific. Some details you could include:
- Invoice Status: with options “PAID” or “UNPAID”
- Invoice Number – this could be a basic text field with the ‘increment’ default value [auto_id start=1]
- Date & Payment Due Date – The invoice date can use the [date] default value and the Payment Due Date can use an additional snippet to automatically set the 2nd date at +30 days. You can read more about it HERE
- Total – This is a text field which auto calculates it’s value from the itemised lines.
- Customer Details – The customer details section uses lookup fields from the ‘Add a new customer’ form so that you only need to select the customer name from the dropdown, and the rest of the fields auto-populate. You can read more about how to do this HERE
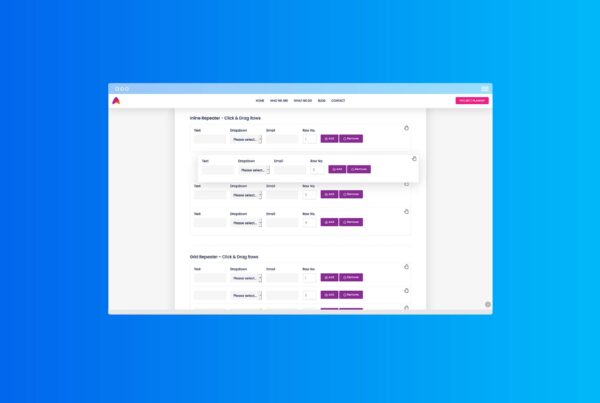
- Itemised lists – This can be a ‘section’ fields containing fields such as: Item description, Qty, cost & total. The total field is a calculation using the Qty & Cost fields. You can obviously add or remove as many as you will need.
One option to expand the functionality further is to have the itemised items as lookup fields that you can select from a pre-set list. Descriptions and item costs could all be stored in a DB and looked up to make things easier & faster.
After we built the forms
That’s all that’s required for the new invoice form. Once you have the 2 forms completed you’ll need to create a view to display the invoice list and the invoices. It’s also a good idea to add an entry to each one of the forms so that you can test that everything is working.
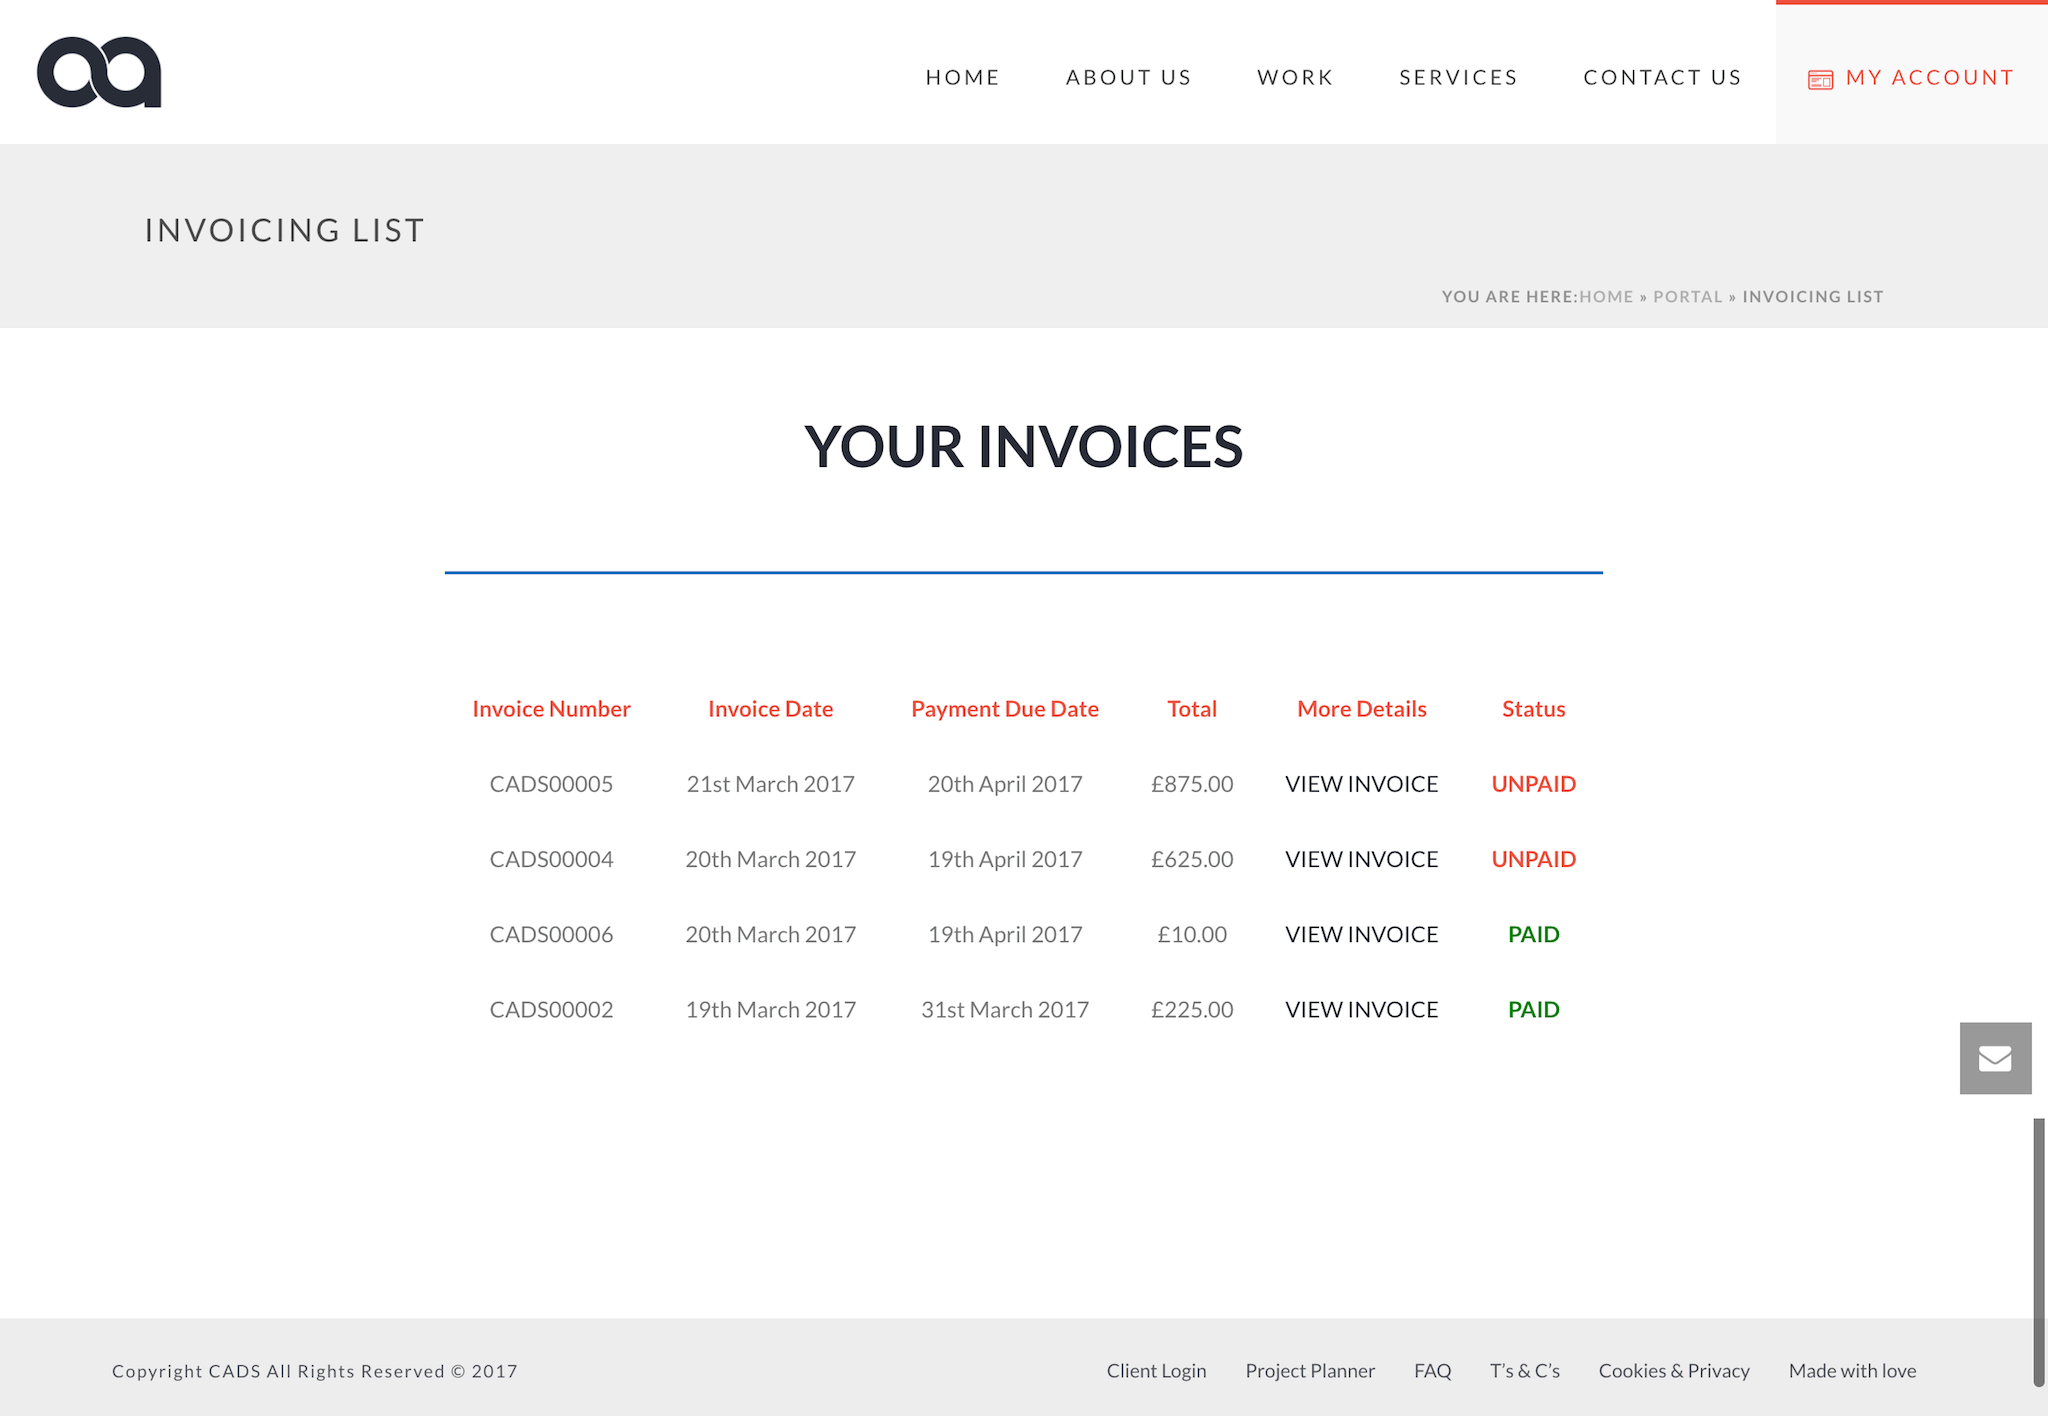
The View for our invoicing system
You will now need to create a view to display your invoices. The view settings will be set as follows:
Basic Settings:
- Use entries from form: Add a new invoice
- View Format: Both (Dynamic)
Advanced Settings > Sort & Filter:
- Order: Invoice Date / Descending
- Filter Entries: Customer > Is equal to > [wpc_client_business_name] – This filter is important as it’s how the correct invoices will be shown to the right customer. The field ‘Customer’ should contain the exact same information as this field will look up. As we mentioned above we use a field in each customer profile called [wpc_client_business_name] but you could use the [display_name] short code instead.
- No entries Message: ‘No Invoices Found’
Listing Page
This just uses a simple HTML table to display some of the info from the form entry and the [detail_link] required to view each entry (invoice).
Our code for this section is below:
Before content:
<table>
<tr>
<td><strong>Invoice Number</strong></td>
<td><strong>Invoice Date</strong></td>
<td><strong>Payment Due Date</strong></td>
<td><strong>Total</strong></td>
<td><strong>More Details</strong></td>
<td><strong>Status</strong></td>
</tr>
Content:
<tr>
<td>CADS0000[115]</td>
<td>[116]</td>
<td>[126]</td>
<td>£[129]</td>
<td><a href="[detaillink]">VIEW INVOICE</a></td>
<td>[if 167 equals="UNPAID"]<strong>[167]</strong>[/if 167][if 167 equals="PAID"]<strong><span style="color:green;">[167]</span></strong>[/if 167]</td>
</tr>
After content:
</table>The View: Details Page
The details page is a little complicated as it uses some HTML tables and other short codes which can be specific to every individual. You can style the details view to your preference.
There’s a great article in the Formidable documentation about how to update a field in your form from within the view. We used this function to add a button to allow the client to mark the invoice as ‘Paid’ so we can keep track of invoices which have been paid or are outstanding. However, you may want to leave this out completely. You can read more about this functionality here.
There is also scope of expanding the functionality of this even further and triggering an email each time this is done. The snippet found here will allow you to automatically send an email notification after a field has been updated.


Summary
Hopefully this will help anyone who is thinking of using Formidable Pro to create invoices for their customers and save you having to install another plugin.
If you liked this tutorial, visit our blog for more ways to improve your websites and workflow.
Enjoy.